

Deploy an application to a Service Fabric cluster in Azure
This post is part two of a series and shows you how to deploy an Azure Service Fabric application to a new cluster in Azure directly from Visual Studio.
In this tutorial you learn how to:
- Create a cluster from Visual Studio
- Deploy an application to a remote cluster using Visual Studio
In this tutorial series, you learn how to:
- Build a .NET Service Fabric application
- Deploy the application to a remote cluster
- Configure CI/CD using Visual Studio Team Services
- Set up monitoring and diagnostics for the application
Deploy the app to the Service Fabric cluster
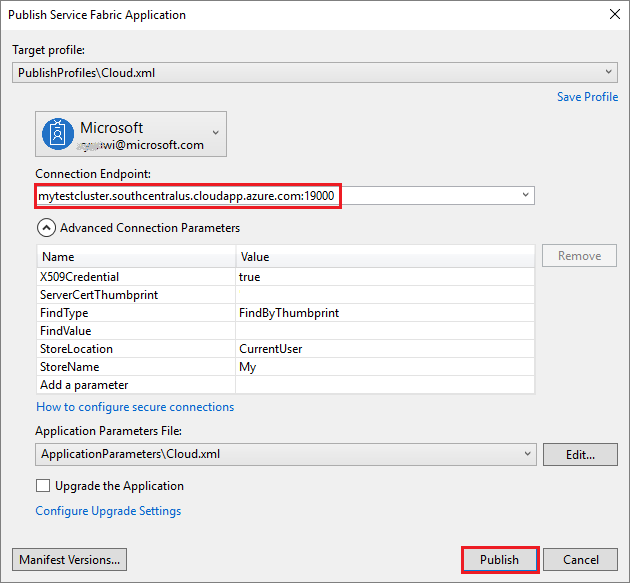
- Right-click on the application project in the Solution Explorer and choose Publish.
- Sign in by using your Azure account so that you can have access to your subscription(s). This step is optional if you’re using a party cluster.
- Select the dropdown for the Connection Endpoint and select the “<Create New Cluster…>” option.
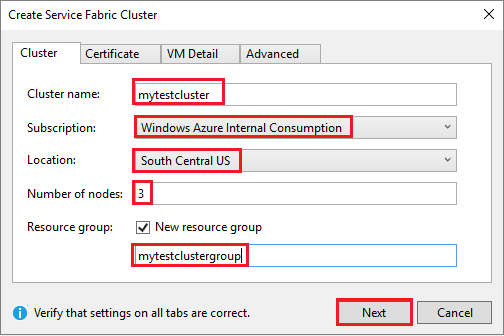
- In the “Create cluster” dialog, modify the following settings:
- Specify the name of your cluster in the “Cluster Name” field, as well as the subscription and location you want to use.
- Optional: You can modify the number of nodes. By default you have three nodes, the minimum required for testing Service Fabric scenarios.
- Select the “Certificate” tab. In this tab, type a password to use to secure the certificate of your cluster. This certificate helps make your cluster secure. You can also modify the path to where you want to save the certificate. Visual Studio can also import the certificate for you, since this is a required step to publish the application to the cluster.
- Select the “VM Detail” tab. Specify the password you would like to use for the Virtual Machines (VM) that make up the cluster. The user name and password can be used to remotely connect to the VMs. You must also select a VM machine size and can change the VM image if needed.
- Optional: On the “Advanced” tab you can modify the list of ports you want opened on the load balancer that will be created along with the cluster. You can also add an existing Application Insights key to be used to route application log files to.
- When you are done modifying settings, select the “Create” button. Creation takes a few minutes to complete; the output window will indicate when the cluster is fully created.
- Once the cluster you want to use is ready, right-click on the application project and choose Publish.
When the publish has finished, you should be able to send a request to the application via a browser.
- Open you preferred browser and type in the cluster address (the connection endpoint without the port information – for example, win1kw5649s.westus.cloudapp.azure.com).
You should now see the same result as you saw when running the application locally.

Next steps
In this tutorial, you learned how to:
- Create a cluster from Visual Studio
- Deploy an application to a remote cluster using Visual Studio
Advance to the next tutorial:
Deploy the app to the Service Fabric cluster
- Right-click on the application project in the Solution Explorer and choose Publish.
- Sign in by using your Azure account so that you can have access to your subscription(s). This step is optional if you’re using a party cluster.
- Select the dropdown for the Connection Endpoint and select the “<Create New Cluster…>” option.
- In the “Create cluster” dialog, modify the following settings:
- Specify the name of your cluster in the “Cluster Name” field, as well as the subscription and location you want to use.
- Optional: You can modify the number of nodes. By default you have three nodes, the minimum required for testing Service Fabric scenarios.
- Select the “Certificate” tab. In this tab, type a password to use to secure the certificate of your cluster. This certificate helps make your cluster secure. You can also modify the path to where you want to save the certificate. Visual Studio can also import the certificate for you, since this is a required step to publish the application to the cluster.
- Select the “VM Detail” tab. Specify the password you would like to use for the Virtual Machines (VM) that make up the cluster. The user name and password can be used to remotely connect to the VMs. You must also select a VM machine size and can change the VM image if needed.
- Optional: On the “Advanced” tab you can modify the list of ports you want opened on the load balancer that will be created along with the cluster. You can also add an existing Application Insights key to be used to route application log files to.
- When you are done modifying settings, select the “Create” button. Creation takes a few minutes to complete; the output window will indicate when the cluster is fully created.
- Once the cluster you want to use is ready, right-click on the application project and choose Publish.
When the publish has finished, you should be able to send a request to the application via a browser.
- Open you preferred browser and type in the cluster address (the connection endpoint without the port information – for example, win1kw5649s.westus.cloudapp.azure.com).
You should now see the same result as you saw when running the application locally.
Next steps
In this tutorial, you learned how to:
- Create a cluster from Visual Studio
- Deploy an application to a remote cluster using Visual Studio
Advance to the next post: Set up continuous integration using Visual Studio Team Services.
Stay Tuned 🙂