

I’m cooking a new DevOps series Azure flavored!
Let’s start cooking on the cloud 🙂
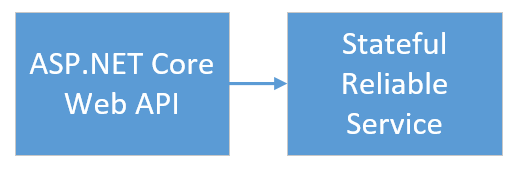
Create and deploy an application with an ASP.NET Core Web API front-end service and a stateful back-end service
This tutorial is part one of a series. You will learn how to create an Azure Service Fabric application with an ASP.NET Core Web API front end and a stateful back-end service to store your data. When you’re finished, you have a voting application with an ASP.NET Core web front-end that saves voting results in a stateful back-end service in the cluster.
In part one of the series, you learn how to:
- Create an ASP.NET Core Web API service as a stateful reliable service
- Create an ASP.NET Core Web Application service as a stateless web service
- Use the reverse proxy to communicate with the stateful service
In this tutorial series you learn how to:
- Build a .NET Service Fabric application
- Deploy the application to a remote cluster
- Configure CI/CD using Visual Studio Team Services
- Set up monitoring and diagnostics for the application
Create an ASP.NET Web API service as a reliable service
First, create the web front-end of the voting application using ASP.NET Core. ASP.NET Core is a lightweight, cross-platform web development framework that you can use to create modern web UI and web APIs. To get a complete understanding of how ASP.NET Core integrates with Service Fabric, we strongly recommend reading through the ASP.NET Core in Service Fabric Reliable Services article. For now, you can follow this tutorial to get started quickly. To learn more about ASP.NET Core, see the ASP.NET Core Documentation.
- Launch Visual Studio as an administrator.
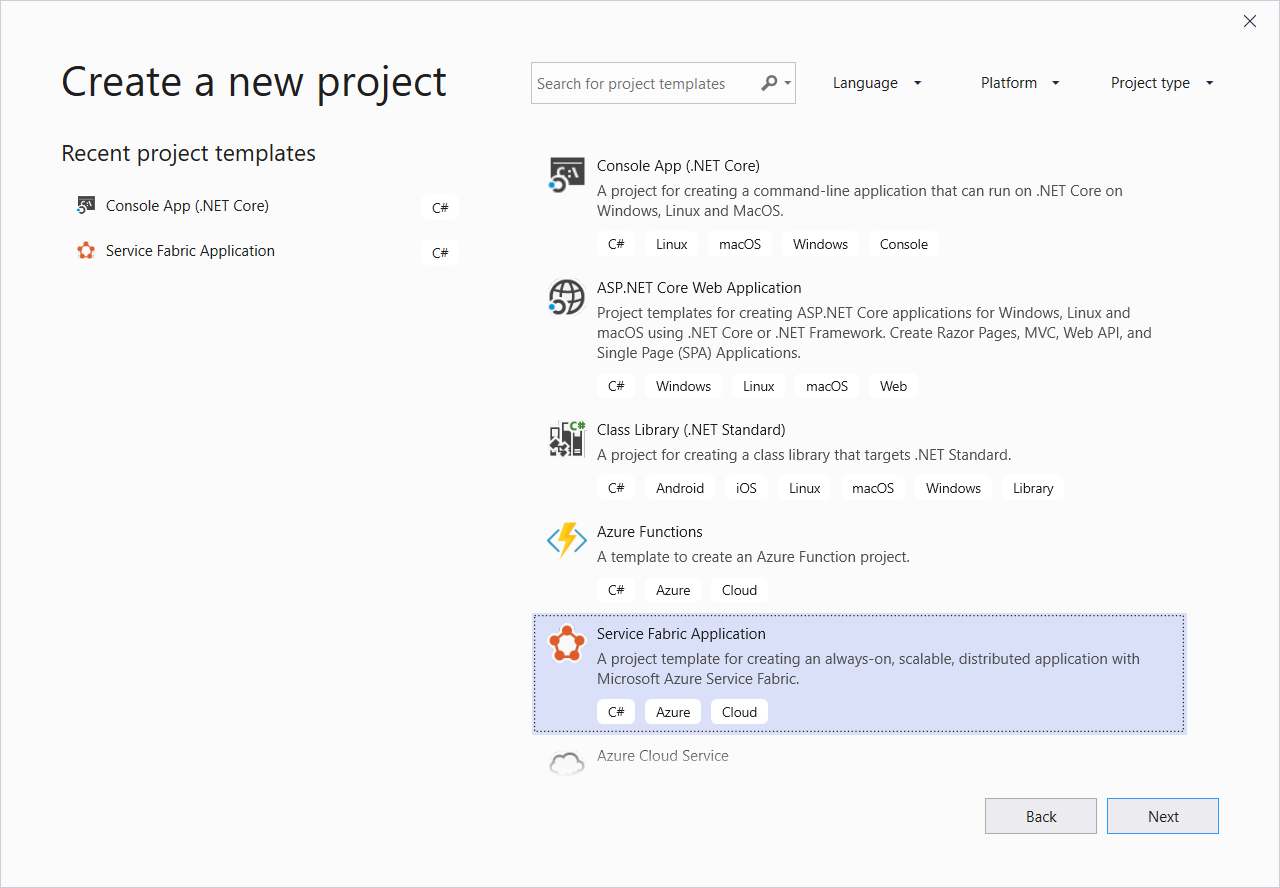
- Create a project with File->New->Project
- In the New Project dialog, choose Cloud > Service Fabric Application.
- Name the application Voting and press OK.
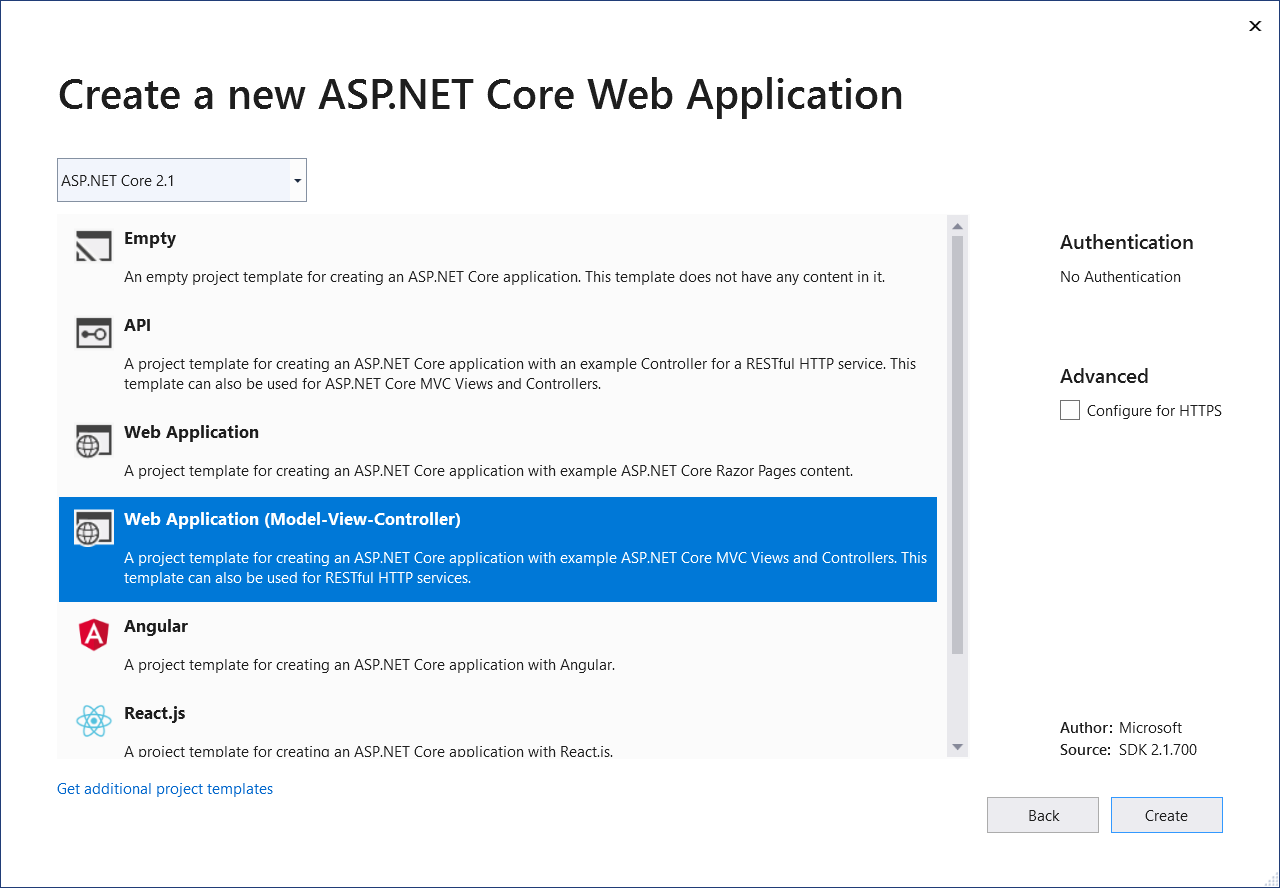
- On the New Service Fabric Service page, choose Stateless ASP.NET Core, and name your service VotingWeb.

- The next page provides a set of ASP.NET Core project templates. For this tutorial, choose Web Application (Model-View-Controller).
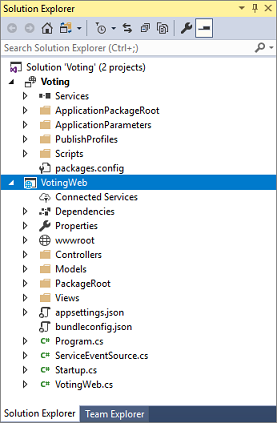
Visual Studio creates an application and a service project and displays them in Solution Explorer.
Add AngularJS to the VotingWeb service
Add AngularJS to your service using Bower support. First, add a Bower configuration file to the project. In Solution Explorer, right-click on VotingWeb and select Add->New Item. Select Web and then Bower Configuration File. The bower.json file is created.
Open bower.json and add entries for angular and angular-bootstrap, then save your changes.
{
  "name": "asp.net",
  "private": true,
  "dependencies": {
    "bootstrap": "3.3.7",
    "jquery": "3.2.1",
    "jquery-validation": "1.16.0",
    "jquery-validation-unobtrusive": "3.2.6",
    "angular": "v1.6.8",
    "angular-bootstrap": "v1.1.0"
  }
}
Upon saving the bower.json file, Angular is installed in your project’s wwwroot/lib folder. Additionally, it is listed within the Dependencies/Bower folder.
Update the site.js file
Open the wwwroot/js/site.js file. Replace its contents with the JavaScript used by the Home views:
var app = angular.module('VotingApp', ['ui.bootstrap']);
app.run(function () { });

app.controller('VotingAppController', ['$rootScope', '$scope', '$http', '$timeout', function ($rootScope, $scope, $http, $timeout) {

    $scope.refresh = function () {
        $http.get('api/Votes?c=' + new Date().getTime())
            .then(function (data, status) {
                $scope.votes = data;
            }, function (data, status) {
                $scope.votes = undefined;
            });
    };

    $scope.remove = function (item) {
        $http.delete('api/Votes/' + item)
            .then(function (data, status) {
                $scope.refresh();
            })
    };

    $scope.add = function (item) {
        var fd = new FormData();
        fd.append('item', item);
        $http.put('api/Votes/' + item, fd, {
            transformRequest: angular.identity,
            headers: { 'Content-Type': undefined }
        })
            .then(function (data, status) {
                $scope.refresh();
                $scope.item = undefined;
            })
    };
}]);
Update the Index.cshtml file
Open the Views/Home/Index.cshtml file, the view specific to the Home controller. Replace its contents with the following, then save your changes.
@{
    ViewData["Title"] = "Service Fabric Voting Sample";
}

<div ng-controller="VotingAppController" ng-init="refresh()">
    <div class="container-fluid">
        <div class="row">
            <div class="col-xs-8 col-xs-offset-2 text-center">
                <h2>Service Fabric Voting Sample</h2>
            </div>
        </div>

        <div class="row">
            <div class="col-xs-8 col-xs-offset-2">
                <form class="col-xs-12 center-block">
                    <div class="col-xs-6 form-group">
                        <input id="txtAdd" type="text" class="form-control" placeholder="Add voting option" ng-model="item"/>
                    </div>
                    <button id="btnAdd" class="btn btn-default" ng-click="add(item)">
                        <span class="glyphicon glyphicon-plus" aria-hidden="true"></span>
                        Add
                    </button>
                </form>
            </div>
        </div>

        <hr/>

        <div class="row">
            <div class="col-xs-8 col-xs-offset-2">
                <div class="row">
                    <div class="col-xs-4">
                        Click to vote
                    </div>
                </div>
                <div class="row top-buffer" ng-repeat="vote in votes.data">
                    <div class="col-xs-8">
                        <button class="btn btn-success text-left btn-block" ng-click="add(vote.key)">
                            <span class="pull-left">
                                {{vote.key}}
                            </span>
                            <span class="badge pull-right">
                                {{vote.value}} Votes
                            </span>
                        </button>
                    </div>
                    <div class="col-xs-4">
                        <button class="btn btn-danger pull-right btn-block" ng-click="remove(vote.key)">
                            <span class="glyphicon glyphicon-remove" aria-hidden="true"></span>
                            Remove
                        </button>
                    </div>
                </div>
            </div>
        </div>
    </div>
</div>
Update the _Layout.cshtml file
Open the Views/Shared/_Layout.cshtml file, the default layout for the ASP.NET app. Replace its contents with the following, then save your changes.
<!DOCTYPE html>
<html ng-app="VotingApp" xmlns:ng="http://angularjs.org">
<head>
    <meta charset="utf-8"/>
    <meta name="viewport" content="width=device-width, initial-scale=1.0"/>
    <title>@ViewData["Title"]</title>

    <link href="~/lib/bootstrap/dist/css/bootstrap.min.css" rel="stylesheet"/>
    <link href="~/css/site.css" rel="stylesheet"/>

</head>
<body>
<div class="container body-content">
    @RenderBody()
</div>

<script src="~/lib/jquery/dist/jquery.js"></script>
<script src="~/lib/bootstrap/dist/js/bootstrap.js"></script>
<script src="~/lib/angular/angular.js"></script>
<script src="~/lib/angular-bootstrap/ui-bootstrap-tpls.js"></script>
<script src="~/js/site.js"></script>

@RenderSection("Scripts", required: false)
</body>
</html>
Update the VotingWeb.cs file
Open the VotingWeb.cs file, which creates the ASP.NET Core WebHost inside the stateless service using the WebListener web server.
Add the using System.Net.Http; directive to the top of the file.
Replace the CreateServiceInstanceListeners() function with the following, then save your changes.
protected override IEnumerable<ServiceInstanceListener> CreateServiceInstanceListeners()
{
    return new ServiceInstanceListener[]
    {
        new ServiceInstanceListener(
            serviceContext =>
                new KestrelCommunicationListener(
                    serviceContext,
                    "ServiceEndpoint",
                    (url, listener) =>
                    {
                        ServiceEventSource.Current.ServiceMessage(serviceContext, $"Starting Kestrel on {url}");

                        return new WebHostBuilder()
                            .UseKestrel()
                            .ConfigureServices(
                                services => services
                                    .AddSingleton<HttpClient>(new HttpClient())
                                    .AddSingleton<FabricClient>(new FabricClient())
                                    .AddSingleton<StatelessServiceContext>(serviceContext))
                            .UseContentRoot(Directory.GetCurrentDirectory())
                            .UseStartup<Startup>()
                            .UseServiceFabricIntegration(listener, ServiceFabricIntegrationOptions.None)
                            .UseUrls(url)
                            .Build();
                    }))
    };
}
Also add the GetVotingDataServiceName method, which returns the service name when polled:
internal static Uri GetVotingDataServiceName(ServiceContext context)
{
    return new Uri($"{context.CodePackageActivationContext.ApplicationName}/VotingData");
}
Add the VotesController.cs file
Add a controller, which defines voting actions. Right-click on the Controllers folder, then select Add->New item->Class. Name the file “VotesController.cs” and click Add.
Replace the file contents with the following, then save your changes. Later, in Update the VotesController.cs file, this file is modified to read and write voting data from the back-end service. For now, the controller returns static string data to the view.
namespace VotingWeb.Controllers
{
    using System;
    using System.Collections.Generic;
    using System.Fabric;
    using System.Fabric.Query;
    using System.Linq;
    using System.Net.Http;
    using System.Net.Http.Headers;
    using System.Text;
    using System.Threading.Tasks;
    using Microsoft.AspNetCore.Mvc;
    using Newtonsoft.Json;

    [Produces("application/json")]
    [Route("api/Votes")]
    public class VotesController : Controller
    {
        private readonly HttpClient httpClient;

        public VotesController(HttpClient httpClient)
        {
            this.httpClient = httpClient;
        }

        // GET: api/Votes
        [HttpGet]
        public async Task<IActionResult> Get()
        {
            List<KeyValuePair<string, int>> votes= new List<KeyValuePair<string, int>>();
            votes.Add(new KeyValuePair<string, int>("Pizza", 3));
            votes.Add(new KeyValuePair<string, int>("Ice cream", 4));

            return Json(votes);
        }
     }
}
Configure the listening port
When the VotingWeb front-end service is created, Visual Studio randomly selects a port for the service to listen on. The VotingWeb service acts as the front-end for this application and accepts external traffic, so let’s bind that service to a fixed and well-know port. The service manifest declares the service endpoints. In Solution Explorer, open VotingWeb/PackageRoot/ServiceManifest.xml. Find the Endpoint resource in the Resources section and change the Port value to 80, or to another port. To deploy and run the application locally, the application listening port must be open and available on your computer.
<Resources>
    <Endpoints>
      <!-- This endpoint is used by the communication listener to obtain the port on which to
           listen. Please note that if your service is partitioned, this port is shared with
           replicas of different partitions that are placed in your code. -->
      <Endpoint Protocol="http" Name="ServiceEndpoint" Type="Input" Port="80" />
    </Endpoints>
  </Resources>
Also update the Application URL property value in the Voting project so a web browser opens to the correct port when you debug using ‘F5’. In Solution Explorer, select the Voting project and update the Application URL property.

Deploy and run the application locally
You can now go ahead and run the application. In Visual Studio, press F5 to deploy the application for debugging. F5 fails if you didn’t previously open Visual Studio as administrator.
Note
The first time you run and deploy the application locally, Visual Studio creates a local cluster for debugging. Cluster creation may take some time. The cluster creation status is displayed in the Visual Studio output window.
At this point, your web app should look like this:
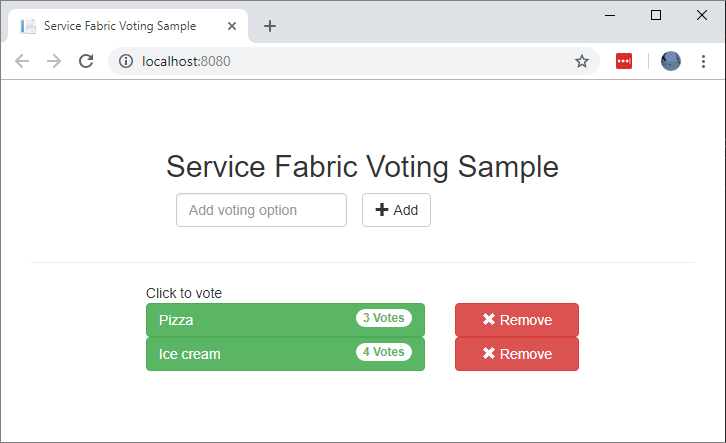
To stop debugging the application, go back to Visual Studio and press Shift+F5.
Add a stateful back-end service to your application
Now that an ASP.NET Web API service is running in the application, go ahead and add a stateful reliable service to store some data in the application.
Service Fabric allows you to consistently and reliably store your data right inside your service by using reliable collections. Reliable collections are a set of highly available and reliable collection classes that are familiar to anyone who has used C# collections.
In this tutorial, you create a service which stores a counter value in a reliable collection.
- In Solution Explorer, right-click Services within the application project and choose Add > New Service Fabric Service.
- In the New Service Fabric Service dialog, choose Stateful ASP.NET Core, and name the service VotingData and press OK.

Once your service project is created, you have two services in your application. As you continue to build your application, you can add more services in the same way. Each can be independently versioned and upgraded.
- The next page provides a set of ASP.NET Core project templates. For this tutorial, choose Web API.

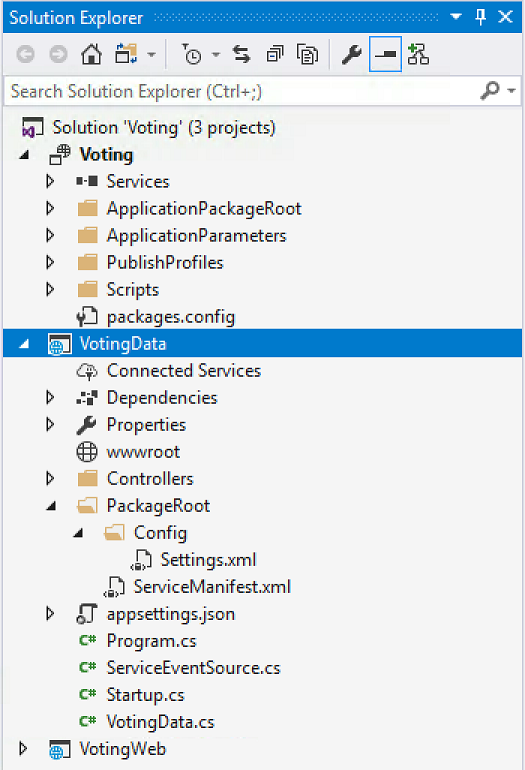
Visual Studio creates a service project and displays them in Solution Explorer.
Add the VoteDataController.cs file
In the VotingData project right-click on the Controllers folder, then select Add->New item->Class. Name the file “VoteDataController.cs” and click Add. Replace the file contents with the following, then save your changes.
namespace VotingData.Controllers
{
    using System.Collections.Generic;
    using System.Threading;
    using System.Threading.Tasks;
    using Microsoft.AspNetCore.Mvc;
    using Microsoft.ServiceFabric.Data;
    using Microsoft.ServiceFabric.Data.Collections;

    [Route("api/[controller]")]
    public class VoteDataController : Controller
    {
        private readonly IReliableStateManager stateManager;

        public VoteDataController(IReliableStateManager stateManager)
        {
            this.stateManager = stateManager;
        }

        // GET api/VoteData
        [HttpGet]
        public async Task<IActionResult> Get()
        {
            CancellationToken ct = new CancellationToken();

            IReliableDictionary<string, int> votesDictionary = await this.stateManager.GetOrAddAsync<IReliableDictionary<string, int>>("counts");

            using (ITransaction tx = this.stateManager.CreateTransaction())
            {
                Microsoft.ServiceFabric.Data.IAsyncEnumerable<KeyValuePair<string, int>> list = await votesDictionary.CreateEnumerableAsync(tx);

                Microsoft.ServiceFabric.Data.IAsyncEnumerator<KeyValuePair<string, int>> enumerator = list.GetAsyncEnumerator();

                List<KeyValuePair<string, int>> result = new List<KeyValuePair<string, int>>();

                while (await enumerator.MoveNextAsync(ct))
                {
                    result.Add(enumerator.Current);
                }

                return this.Json(result);
            }
        }

        // PUT api/VoteData/name
        [HttpPut("{name}")]
        public async Task<IActionResult> Put(string name)
        {
            IReliableDictionary<string, int> votesDictionary = await this.stateManager.GetOrAddAsync<IReliableDictionary<string, int>>("counts");

            using (ITransaction tx = this.stateManager.CreateTransaction())
            {
                await votesDictionary.AddOrUpdateAsync(tx, name, 1, (key, oldvalue) => oldvalue + 1);
                await tx.CommitAsync();
            }

            return new OkResult();
        }

        // DELETE api/VoteData/name
        [HttpDelete("{name}")]
        public async Task<IActionResult> Delete(string name)
        {
            IReliableDictionary<string, int> votesDictionary = await this.stateManager.GetOrAddAsync<IReliableDictionary<string, int>>("counts");

            using (ITransaction tx = this.stateManager.CreateTransaction())
            {
                if (await votesDictionary.ContainsKeyAsync(tx, name))
                {
                    await votesDictionary.TryRemoveAsync(tx, name);
                    await tx.CommitAsync();
                    return new OkResult();
                }
                else
                {
                    return new NotFoundResult();
                }
            }
        }
    }
}
Connect the services
In this next step, connect the two services and make the front-end Web application get and set voting information from the back-end service.
Service Fabric provides complete flexibility in how you communicate with reliable services. Within a single application, you might have services that are accessible via TCP. Other services that might be accessible via an HTTP REST API and still other services could be accessible via web sockets. For background on the options available and the tradeoffs involved, see Communicating with services.
In this tutorial, use ASP.NET Core Web API.
Update the VotesController.cs file
In the VotingWeb project, open the Controllers/VotesController.cs file. Replace the VotesController class definition contents with the following, then save your changes.
public class VotesController : Controller
{
    private readonly HttpClient httpClient;
    private readonly FabricClient fabricClient;
    private readonly StatelessServiceContext serviceContext;

    public VotesController(HttpClient httpClient, StatelessServiceContext context, FabricClient fabricClient)
    {
        this.fabricClient = fabricClient;
        this.httpClient = httpClient;
        this.serviceContext = context;
    }

    // GET: api/Votes
    [HttpGet("")]
    public async Task<IActionResult> Get()
    {
        Uri serviceName = VotingWeb.GetVotingDataServiceName(this.serviceContext);
        Uri proxyAddress = this.GetProxyAddress(serviceName);

        ServicePartitionList partitions = await this.fabricClient.QueryManager.GetPartitionListAsync(serviceName);

        List<KeyValuePair<string, int>> result = new List<KeyValuePair<string, int>>();

        foreach (Partition partition in partitions)
        {
            string proxyUrl =
                $"{proxyAddress}/api/VoteData?PartitionKey={((Int64RangePartitionInformation) partition.PartitionInformation).LowKey}&PartitionKind=Int64Range";

            using (HttpResponseMessage response = await this.httpClient.GetAsync(proxyUrl))
            {
                if (response.StatusCode != System.Net.HttpStatusCode.OK)
                {
                    continue;
                }

                result.AddRange(JsonConvert.DeserializeObject<List<KeyValuePair<string, int>>>(await response.Content.ReadAsStringAsync()));
            }
        }

        return this.Json(result);
    }

    // PUT: api/Votes/name
    [HttpPut("{name}")]
    public async Task<IActionResult> Put(string name)
    {
        Uri serviceName = VotingWeb.GetVotingDataServiceName(this.serviceContext);
        Uri proxyAddress = this.GetProxyAddress(serviceName);
        long partitionKey = this.GetPartitionKey(name);
        string proxyUrl = $"{proxyAddress}/api/VoteData/{name}?PartitionKey={partitionKey}&PartitionKind=Int64Range";

        StringContent putContent = new StringContent($"{{ 'name' : '{name}' }}", Encoding.UTF8, "application/json");
        putContent.Headers.ContentType = new MediaTypeHeaderValue("application/json");

        using (HttpResponseMessage response = await this.httpClient.PutAsync(proxyUrl, putContent))
        {
            return new ContentResult()
            {
                StatusCode = (int) response.StatusCode,
                Content = await response.Content.ReadAsStringAsync()
            };
        }
    }

    // DELETE: api/Votes/name
    [HttpDelete("{name}")]
    public async Task<IActionResult> Delete(string name)
    {
        Uri serviceName = VotingWeb.GetVotingDataServiceName(this.serviceContext);
        Uri proxyAddress = this.GetProxyAddress(serviceName);
        long partitionKey = this.GetPartitionKey(name);
        string proxyUrl = $"{proxyAddress}/api/VoteData/{name}?PartitionKey={partitionKey}&PartitionKind=Int64Range";

        using (HttpResponseMessage response = await this.httpClient.DeleteAsync(proxyUrl))
        {
            if (response.StatusCode != System.Net.HttpStatusCode.OK)
            {
                return this.StatusCode((int) response.StatusCode);
            }
        }

        return new OkResult();
    }


    /// <summary>
    /// Constructs a reverse proxy URL for a given service.
    /// Example: http://localhost:19081/VotingApplication/VotingData/
    /// </summary>
    /// <param name="serviceName"></param>
    /// <returns></returns>
    private Uri GetProxyAddress(Uri serviceName)
    {
        return new Uri($"http://localhost:19081{serviceName.AbsolutePath}");
    }

    /// <summary>
    /// Creates a partition key from the given name.
    /// Uses the zero-based numeric position in the alphabet of the first letter of the name (0-25).
    /// </summary>
    /// <param name="name"></param>
    /// <returns></returns>
    private long GetPartitionKey(string name)
    {
        return Char.ToUpper(name.First()) - 'A';
    }
}
Walk through the voting sample application
The voting application consists of two services:
- Web front-end service (VotingWeb)- An ASP.NET Core web front-end service, which serves the web page and exposes web APIs to communicate with the backend service.
- Back-end service (VotingData)- An ASP.NET Core web service, which exposes an API to store the vote results in a reliable dictionary persisted on disk.
When you vote in the application the following events occur:
- A JavaScript sends the vote request to the web API in the web front-end service as an HTTP PUT request.
- The web front-end service uses a proxy to locate and forward an HTTP PUT request to the back-end service.
- The back-end service takes the incoming request, and stores the updated result in a reliable dictionary, which gets replicated to multiple nodes within the cluster and persisted on disk. All the application’s data is stored in the cluster, so no database is needed.
Debug in Visual Studio
When debugging application in Visual Studio, you are using a local Service Fabric development cluster. You have the option to adjust your debugging experience to your scenario. In this application, store data in the back-end service using a reliable dictionary. Visual Studio removes the application per default when you stop the debugger. Removing the application causes the data in the back-end service to also be removed. To persist the data between debugging sessions, you can change the Application Debug Mode as a property on the Voting project in Visual Studio.
To look at what happens in the code, complete the following steps:
- Open the VotesController.cs file and set a breakpoint in the web API’s Put method (line 63) – You can search for the file in the Solution Explorer in Visual Studio.
- Open the VoteDataController.cs file and set a breakpoint in this web API’s Put method (line 53).
- Go back to the browser and click a voting option or add a new voting option. You hit the first breakpoint in the web front-end’s api controller.
- This is where the JavaScript in the browser sends a request to the web API controller in the front-end service.
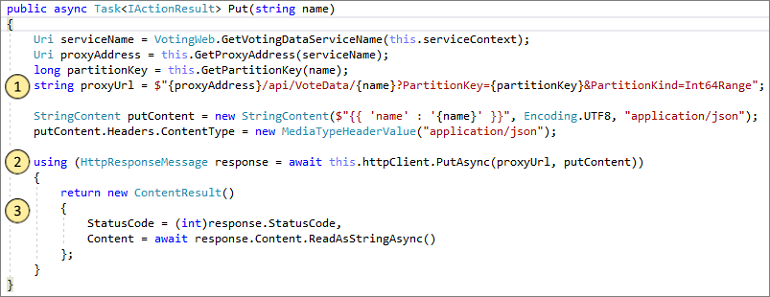
- First construct the URL to the ReverseProxy for the back-end service (1).
- Then send the HTTP PUT Request to the ReverseProxy (2).
- Finally the return the response from the back-end service to the client (3).
- This is where the JavaScript in the browser sends a request to the web API controller in the front-end service.
- Press F5 to continue
- You are now at the break point in the back-end service.
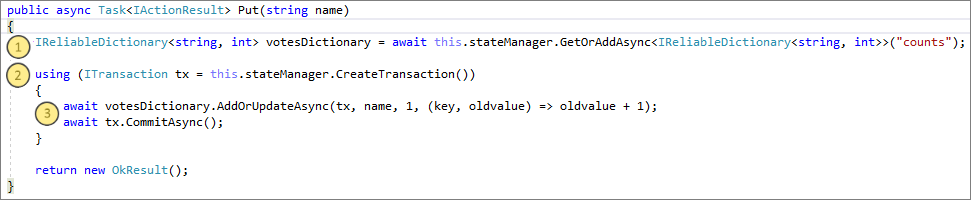
- In the first line in the method (1) use the
StateManagerto get or add a reliable dictionary calledcounts. - All interactions with values in a reliable dictionary require a transaction, this using statement (2) creates that transaction.
- In the transaction, update the value of the relevant key for the voting option and commits the operation (3). Once the commit method returns, the data is updated in the dictionary and replicated to other nodes in the cluster. The data is now safely stored in the cluster, and the back-end service can fail over to other nodes, still having the data available.
- You are now at the break point in the back-end service.
- Press F5 to continue
To stop the debugging session, press Shift+F5.
Next steps
In this part of the tutorial, you learned how to:
- Create an ASP.NET Core Web API service as a stateful reliable service
- Create an ASP.NET Core Web Application service as a stateless web service
- Use the reverse proxy to communicate with the stateful service
Advance to the next tutorial:Deploy the application to Azure.
Stay Tuned 🙂